N-FOCUS is changing how list prints are processed beginning 07-10-06. As part of this, the displays in response to the user clicking on a print menu item on list windows. Displaying the Viewer lets the user readily see how large the document is before sending it to the printer, and allows the user to further refine the document before printing it.
The main List Print Viewer window provides user navigation using toolbar icons, and menu items.

The first icon on the toolbar permits the document to be exported into other file formats; in particular, it is possible to export the data to Excel.
The second icon is the print icon. You can also print using the menu item File | Print, or the standard keyboard shortcut, CTRL + P.
The third icon refreshes the display of the document. This is not applicable to list prints.
The fourth icon toggles display of the group navigation pane. When the data in a document is grouped, the group navigation pane displays the group names included in the document, and when a group name is clicked, you are taken to that group’s location in the document.
The next four icons provide one option for page navigation; they correspond to the first page, the previous page, the next page, and the last page. Another option for navigating is to click on the document display, and use the keyboard Page Up, Page Down, up arrow, and down arrow keys.
Next in the toolbar is the page number display. The current page number can be over-typed to go directly to that page.
The binoculars icon enables searching through the document for the specified text.
The last item on the toolbar controls the zoom factor. In addition to the drop down, when keyboard focus is in this control, the zoom factor can be changed using the mouse wheel.
The File menu has items Change Title, Print, and Close. If the user wants to modify the document’s title to further describe the result of any sorts or filters, the Change Title menu provides that capability; however, the title is limited to a total of 127 characters. Print will print the document, and Close will close the Viewer window.
The View menu has items for sorting and filtering the document: Sort, Basic Filter, Advanced Filter, and Un-filter. Un-filter will remove any filtering currently applied in the document. The other menu items bring up windows where the user can change the sort order, and/or filtering criteria. These windows are described in more detail elsewhere.
The Help menu has the standard items included in other N-FOCUS windows.
When sorting and/or filtering are done in the calling list window, that information is also applied to the document in the viewer, and when possible, will be used to pre-populate the Viewer’s sort and filter windows. If the user changes the sorting and/or filtering using the Viewer’s sort and filter windows, these windows continue to be pre-populated with the current sort and filter.

The Viewer Sort window consists of 6 combo boxes, each listing the columns available for sorting, and associated radio buttons indicating whether the sort should be ascending or descending. The Clear button in each group box clears the sort item selected in that group, and resets the sort order to ascending. The Clear All button at the bottom of the window clears all sort items selected.
Any item used to group the information in the document will also be in the Viewer sort window, but will be disabled since the grouping cannot be changed.
Clicking the OK button applies the new sort to the document, and re-displays the document in the viewer.

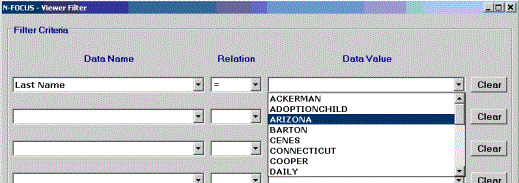
The Viewer Filter window permits specifying up to 8 filter criteria. Each criterion is specified by selecting an available item from the Data Name combo box, an item from the Relation combo box (=; Not =; <; < Or =; >; > Or =), and an item from the Data Value combo box. The Data Value combo box is populated with the unique values in the list print for the Data Name item selected.
The Clear buttons clear the filter criterion to the left; the Clear All button clears all filter criteria.
Clicking the OK button applies the filter criteria to the document, and re-displays the document. Data must meet all filter criteria to display in the document.

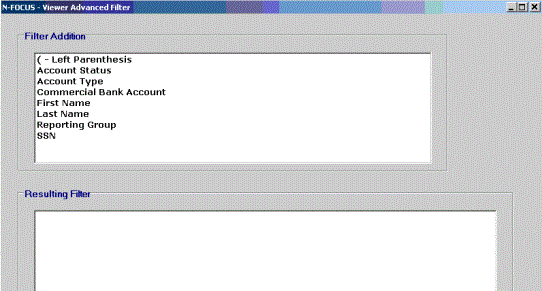
The Viewer Advanced Filter window consists of 2 list boxes and 4 buttons. The user repeatedly double-clicks items in the Filter Addition list box to add them to the Resulting Filter list box.
Unlike the Basic Filter window, more options are available in the Advanced Filter window. Criteria can be joined using OR, in addition to AND; and parentheses can be used to group criteria together; for example, Account Status = Open AND (Account Type = Dedicated OR Account Type = Guardianship).
For text values, in addition to the normal relation operators such as =, there are operators Begins With, Ends With, and Contains, permitting filters such as the first letters of names, or portions of Organization names. (Text comparisons are not case-sensitive; Open is considered the same as open and OPEN.)
Also unlike the Basic Filter window, the user can specify values in addition to those included in the list box, by double-clicking on the list box item User-specified value. When this value is a date, a calendar month control displays.
The date can be specified by either typing in the edit box, or selecting a date on the control. Clicking on the month name in the control displays a context menu displaying all 12 months from which to select; clicking on the year displays a spin control for changing the year, clicking on a day selects it, and clicking the OK button selects that date.
Clicking the Back button on the Advanced Filter window removes the last line in the Resulting Filter list box.
Clicking the Clear button removes all lines from the Resulting Filter list box.
The new filter can be applied by either double-clicking the DONE item when it appears in the Filter Addition list box, or by clicking the OK button. In either case, the filter is applied to the document, which is re-displayed in the Viewer.
(07-2006)